Wednesday, December 31, 2008

Mini Waterfall Album

Hi everyone,

As promised in an earlier post, I can now show you the mini waterfall album I made as a Christmas present for my daughter and my youngest grandson (5 yrs. old). I thought it was a lovely way to show off some family photos and make a gift that will be treasured for a long time.

I learnt how to make this album at a Kaszazz workshop a few months ago and it turned out so well that I know I will make more of these. I have modified the instructions so if you like what you see and want to know how to make one for yourself, contact me for more information - (see my contact details at the top of this blog).

Here is the cover page - the album uses two - 12" x 12" sheets of cardstock (with some left over) and any patterned papers and embellishments of your choice. All you need to add are the photos - one 5" x 7" for the inside of the cover and 6 or more which can be cropped to size to add to the inside panels of the 'waterfall'.


The photo below is of the inside cover which you can decorate any way you choose and it also shows the photo panels in their folded state.


As you pull the tab at the side, the 6 panels slowly unfold to reveal your photos and embellishments (see below). I was fascinated when I first saw one of these albums and I have had the same reaction to mine whenever I show it to other people - they are amazed at how it all works and can't believe how easy it is to make once I show them how.


Each panel slowly opens and falls back on itself creating the 'waterfall' effect.

To close the album, you just push the side tab back in again and the photo panels return to their original positions. You can make this album as simple or as decorative as you like by adding journalling, 3D embellishments, stickers, stamped images, ribbons, flowers, etc.


One of my friends Debbie Pamment has already made one as a gift for some friends of hers - check out her blog here to see her wonderful version.


I hope you like my album and if I have inspired you to create your own, please contact me for more details.


Well, until next time - happy crafting !!

Belated Blog Awards - #1

As the last few months have flown by so quickly, I have been very slack and need to attend to a few things which I've neglected - namely passing on some Blog Awards.


I received two of these awards from my friends and fellow team members - Kellie Winnell and Robyn Clarke and I would now like to pass them on to others who I think deserve them.

I have to nominate 8 blogs for each award so here are my first eight nominees -

Yvonne Campbell - my upline and an extremely talented lady. Yvonne goes out of her way to help all of us in her team and I watch in amazement as she whips up cards and 3D items in a few minutes flat, just putting paper, stamps and ribbons together with ease to create such beautiful items. Her blog is always full of inspiration and lovely creations and great family anecdotes too!

Debbie Pamment - my new friend and team-mate. We met over coffee and became instant friends and even though Debbie is only a newbie to Stampin' Up, she has inspired me with her regular new creations every few days. I have seen some of her cards and other projects in person and she has talent to spare! I keep going back to her blog to see what she's come up with next!

Robyn Clarke - another new member of our team whom I first met at our Regional in Melbourne recently. I love Robyn's work and regularly visit her blog to see her latest cards. She made some lovely projects recently for a Trade Night at which she demonstrated her artwork and this award is for the inspiration she shares with everyone and also as a Thank You for honoring me with this award (my second).

Jenni Oliver - a lovely girl who is so welcoming when I and other girls visit her for stamping sessions, giving all of us free reign of her craft room and supplies and sharing her wonderful creations and ideas. I love visiting her blog to see her latest cards and projects and always pick up new ideas when I do.

Makeesha Byl - Keesh creates such beautiful cards and her blog is an endless array of inspiration. I love her work and always check out her latest projects every day or so. Her colour challenges are another source of great ideas and I will get around to submitting an entry one day!

Marelle Taylor - another extremely talented artist, producing the most exquisite cards with gorgeous colours and ideas! I am constantly checking out her blog for inspiration. I really love her work.

Karen Thomas - such gorgeous cards and other projects on her blog. I love her work too and always keep returning to see what new and exciting things she's come up with.

Carol Dunstan - I love the colours Carol uses in her cards and I always find new things to try out when I visit her blog. Wonderful creations!


I will list my other 8 Blog Award nominees in my next posts.

Please take some time out to visit the above 8 blogs and see what I'm talking about! I'm sure you'll find lots of things to admire and inspire you.


'Bye for now. I hope you all have a safe and Happy New Year's Eve - Celebrate !!

Tuesday, December 30, 2008

More Christmas Cards ....

Hi again - still on the Christmas theme, here are a few more cards which I created today.
A bit late for this year I know, but at least I've got a head start on next year ! LOL

I love the colours in the SU - DS Wintergreen papers so made two more cards using these.

For this first one, I used Sage Shadow for the base card and Wintergreen striped paper, stamped the greeting, swirls and Poinsettias on Very Vanilla cardstock and attached some grosgrain ribbon.

SU Supplies:

Cardstock - Sage Shadow, Very Vanilla
Inks - Sage Shadow, Certainly Celery
Stamp set - Season of Joy
Ribbon - Mellow Moss - grosgrain
DS Papers - Wintergreen

Extras - silver brads, KindyGlitz - Crystalline


I decided to make a square card for this next one - also in the same colourway but with a little twist.


I used one of the paler Wintergreen papers and sponged it with Sage Shadow ink, leaving a clear area in which to stamp the greeting. The edges of the square paper were also inked with Sage Shadow before mounting on the Sage base card.

I then cut a triangular piece of the striped Wintergreen paper to fit in the bottom right-hand corner. Using this piece, I positioned it over some Sage Shadow cardstock and cut this out slightly bigger to allow for the scalloped edge which I punched out using my Scallop Border punch.

All edges were again sponged with the Sage Shadow ink before mounting onto the square paper.

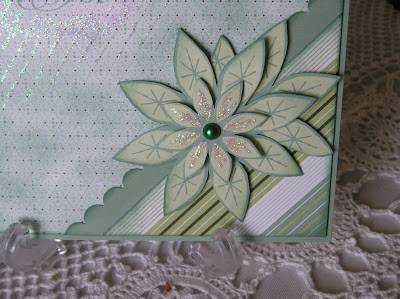
The Poinsettias were actually cut from another piece of Wintergreen paper - I used two whole flowers - one large and one small plus one of the 'half' flowers for added depth. I sponged the edges of the petals and attached them to the corner piece using 3D foam squares.

A green half pearl was added to the centre of the top flower.

To finish off the card, I ran Kindy Glitz along the lines in the patterned paper and around the greeting and also used it on the petals of the small flower for a little Christmas Bling!

I'm sorry but the photo doesn't do justice to the sparkling glittered lines which look like falling rain !

Here is a close up of the mounted flower.


SU Supplies:
Cardstock - Sage Shadow
Ink - Sage Shadow
Stamp set - Occasional Greetings
DS Papers - Wintergreen
Punch - Scallop Border

Extras - Green half pearl, Kindy Glitz - Crystalline


For this last card, I used the traditional red and green combination with the Dashing DS papers.

I stamped the Real Red base card with the small flower stamp from the Season of Joy set, using Wild Wasabi ink. I cut out notched corners from a rectangular piece of DS Dashing paper and attached it to a bigger rectangle of Glorious Green cardstock. This was then also notched at the corners using a circle punch.

The tag was made using the Scallop Circle punch on Glorious Green cardstock, (I pierced a small hole in each scallop for a decorative touch), the 1 1/2" circle punch with Real Red cardstock and the greeting was stamped on Whisper White cardstock with Real Red ink and then punched out using the 1 1/4" circle punch. The red circle was attached to the scallop circle using double-sided tape and the greeting was mounted on 3D foam dots before attaching to the red circle.

I added a piece of double-stitched Wild Wasabi ribbon to the patterned paper piece then mounted these onto the base card.

I then mounted the tag over the ribbon using 3D foam squares.

As a final touch, I added two red flower gems.

SU Supplies:

Cardstock - Real Red, Glorious Green
Ink - Real Red
Stamp set - Merry, Merry
DS Papers - Dashing
Ribbon - Wild Wasabi double-stitched
Punches - Scallop circle, 1 1/2" circle, 1 1/4" circle, small circle punch for notched corners

Extras - Flower gems

Well, I think you've probably had enough of Christmas cards now so in my next post I'll show you something else.

Thanks for visiting - hope you'll drop by again soon.

Happy Stampin' !

Saturday, December 27, 2008

Christmas has come and gone .......

Hi everyone, I hope you all had a wonderful Christmas with your family and friends - celebrating, eating everything you shouldn't, watching kids tearing through the wrapping paper as they unwrap each present in anticipation !

I had a lovely time over Christmas with family - Christmas Day was spent quietly relaxing with my partner, Boxing Day with my daughter and my youngest grandson (5 yrs), Saturday with my eldest grandson (14 yrs) and yesterday with one of my sisters. It was wonderful to catch up with everyone though I'm still not finished - have still to see other family members and friends over this next week!

I was very late with my Christmas cards this year but here is the card I made for my sister and some others which were the last ones I sent out to friends.


I CASEd this design from someone else's blog and I apologise for not mentioning that person here but I can't remember exactly where I saw it. (If you are reading this and it's your original design, please let me know.)


SU supplies: DS Papers - Wintergreen / Ink - Sage Shadow / Stamps - Season of Joy / Ribbon - Soft Sky stitched. Extras - Silver brads.


These cards are non-Stampin' Up! cards but I hope you like them as well.


The image on this card was stamped twice and one of the images was cut out and layered onto the base with 3D foam dots.

The red glitter frame around the main image was made using double-sided tape and after removing the paper from the tape, I sprinkled the glitter over the sticky strips.

A red bow & red flower embellishment add the finishing touches.


This card was made using a Cuttlebug embossing folder and peel-off stickers for the stars and corners. I love pastel colours for Christmas and thought that pink and silver would look realy nice together.

This one below has punched snowflakes and self-adhesive gems, white ric-rac ribbon and the greeting is from a sheet of rub-ons.


This next one has some SU items on it.


This one uses the SU DS paper from the Dashing set and I stamped the background with the Poinsettia stamp from the Season of Joy set.

The trees were cut out using a Sizzix die and I added a rub-on greeting and red satin ribbon to finish off.


Well, I hope you like this little collection. I am planning to add a slide show of my cards for you to look at so once I get it up and running, you will be able to see what other creations I have made over time.

Thanks for visiting - 'bye for now. Please come back again soon - I have more to show you!

Friday, December 19, 2008

Tres Chic, mon ami !

Well girls, as promised, here are some more of my creations. Last Saturday I spent the day with my upline Yvonne and three girls from our team - Robyn, Leanne & Leonie.
The weather that day was awful with lashing rain and gale-force winds but we were cosy and dry inside the house (well some of us were - and that's another story ! LOL) and we had a wonderful time making cards and gift boxes.


We tried some Iris Folding which was fun as we added some of the new chunky glitter (from the Summer Mini) to our folded paper strips which really added some pizzazz !


I wasn't happy with my card so am re-working it and will post it soon but you can check out the other girls' cards on their blogs - see my Blog List.


Here is one of the cards I made that day.


Materials for the card -

Cardstock - Almost Amethyst, Old Olive

Die Cut Blooms - Bashful Blue (Spring Mini)


DSP - Summer Picnic (Spring Mini)

Ink - Blue Bayou

Ribbon - Moss gingham

Greeting - Eastern Elegance Rub-Ons (Spring Mini)

Extras - Crop-a-Dile - (for punching the holes in the flower petals), self-adhesive pearl for the flower centre, blue self-adhesive gems.


Both the small flower and the larger one were mounted using foam squares.

I also made a little gift box to match -


Materials for the gift box -


DS Paper - Summer Picnic (Spring Mini)


Die Cut Blooms - Bashful Blue (Spring Mini)


Cardstock - Bashful Blue


Extra - small blue self-adhesive gem for flower centre.


We had a great day despite the weather and it was nice to catch up with the other girls as they all live over the other side of town and it was the first time I had spent the day creating with them.


We had all only recently met at the Melbourne Regional so by the end of the day, we had become good friends. Of course, the luscious cake I brought along that day helped to bridge the friendship gap!! Oooh it was so yummy !!


While I was still feeling inspired this week, I made another card the other night after work. I had wanted to use my Tres Chic background stamp and thought of an idea for a card while I was looking at my new rolls of satin Pomegranate ribbon which I'd just bought.


I thought of adding a strong contrasting colour so chose a piece of Blue Bayou cardstock and punched out an oval to highlight the word 'Hope'. I thought that this card could be used for Christmas or any other special occasion and to dress it up a little, I added glitter to the stamped flourishes, inked the torn edges and added some pearls and lastly the beautiful satin ribbon to match the inked words.


Materials -

Cardstock - Very Vanilla, Blue Bayou

Inks - Purely Pomegranate, Blue Bayou

Stamps - Priceless set (swirls) / Background Stamp - Tres Chic (main catalogue)

Ribbon - Purely Pomegranate satin (Spring Mini)

Extras - Kindy Glitz - crystalline / self-adhesive pearls


Hope you like these - there will be more to come over the next week as I have a few more items to finish off and upload for you to see.


Have a lovely weekend - until next time ........

Wednesday, December 10, 2008

Busy, Busy this week.

Hi everyone, I must apologise for not putting up anything new as promised.

I started a new full-time job just last Wednesday and it's been a case of early morning starts,
mental stress learning new systems and by the time I get home, I'm ready for sleep!

I hope to relax on the weekend and make some more cards and things to show you.

Really looking forward to a short break over Christmas / New Year.

Well, must go to bed - ready for another working day tomorrow.

Please keep checking back as there will be more new things coming up here for you to look at.

'Bye for now.

Sunday, December 7, 2008

Tying Up Christmas Promotion

Santa's almost here - only 18 sleeps to go! We have a wonderful promotion for December - just perfect for that special gift for your stamping friends or better still, give yourself a gift !

Browse through this list of great specials (click here to view) and place your order with me now so that it will arrive in time for Christmas. If you want to make this gift even more special, giftwrap it using our Designer Paper range - we have two Christmas themed packs, Holiday Harmony with rich colours of Pomegranate, Old Olive, Sage and the Dashing pack in the traditional colours of Red, Green and River Rock. Add some co-ordinating ribbons, stamp some tags and you can create gifts that anyone would love to receive and they will be extra special as they will be 'handmade by you' !

Remember, time is quickly slipping away - contact me with your Christmas orders now.

I've been busy this weekend so I'm a bit slack with new posts - but stay tuned, there are lots more to come. Keep checking this site for more cards and projects.

'Bye for now - Happy Stampin' !

Wednesday, December 3, 2008

Two Blog Awards in the one week !


Wow, I can't believe it but I've received two Blog Awards this week - how fantastic !
My very first one was from Kellie Winnell, one of our team members. Kellie is a lovely new stamping friend I've made in recent weeks through comments on each other's blogs and our 'chatty' emails. She also drew my name out of her prize hat in a recent competition on her blog so I've received two lovely 'prizes' from her now- how fabulous ! Her blog is wonderful - click here to take a look !
My second Blog Award was given to me by Robyn Clarke, also another member of our team
(under our Upline, Yvonne Campbell). Her wonderful comments about my blog really amazed me and I feel so honoured. I met Robyn for the first time at our Regional last month - she is a newbie like me and I love her creations. Why not check out her blog and see for yourself - click here.

These awards are flying around everywhere. Debbie Pamment, also a newbie and my lovely new friend, passed out her awards this week and mentioned me with some very lovely comments on her blog. Now, she is one very talented (and busy) lady who is always creating new things every day or two - I can't keep up with her. Her latest creations are some lovely stamped candles just right for Christmas. Go and check them out on her blog - click here.
I'm amazed at how many talented people we have in our team and also in Australia - it's mind boggling ! Everyday, there are so many beautiful creations to look at and gain inspiration from,
we should be so proud of ourselves!
If you've been thinking of joining our Stampin' Up! family but you're not really sure about it,
'just do it' - you won't regret it. I did and a whole new world has opened up for me - as you can see by the above article, I've made so many new friends, shared in some wonderful experiences and I'm having a fantastic time !
Do you want to know more about Stampin' Up ? Give me a call and I'd love to share my story with you.

Until next time, thank you everyone - hugs to you all.

Tuesday, December 2, 2008

Two new cards from the Summer mini range

Hi everyone, well as I mentioned in my previous post, the colours of the new Designer Series papers in the Summer Mini just make you want to get stuck in and create which is what I did today.

I made this lovely 'Fishy' card using the new Ocean Commotion stamps and some of the Bali Breeze paper. I think the colours work so well together and make you think of Summer fun at the beach.


I positioned the Teal printed paper over the yellow base card first to work out where the greeting would go, then stamped the Birthday greeting in Taken with Teal. I then attached the Teal printed paper on the base card. lightly sponged a square of white cardstock with Soft Sky ink then stamped the marine plants with Mellow Moss at the bottom and the fish with Taken with Teal.

I then mounted the stamped card onto a larger square of textured Wild Wasabi cardstock and punched out the photo corners from Summer Sun cardstock using the Photo Corners punch.

The smaller photo corner was attached to the mounted image with a gold brad, then I attached the mounted image to the printed paper. Finally, I added glitter to the fish and the plants. The Crystalline glitter picks up the base colour of the inks so it looks like I've used two different coloured glitters.

Stampin' Up supplies:-

Stamps - Ocean Commotion (Summer Mini), Occasional Greetings (main 2008 catalogue)
Designer Series paper - Bali Breeze (Summer Mini)
Cardstock - Summer Sun, Wild Wasabi (textured), Whisper White.
Inks - Soft Sky (for sponged background), Taken with Teal (fish & ghreeting), Mellow Moss (marine plants).
Punch - Photo Corners

Non- SU supplies: Gold brad, silver gem (fish eye), Kindy Glitz - Crystalline.


Here is my second card using my new products. I wanted to make something in feminine colours and the Afternoon Tea Designer Papers were the perfect choice. This was a tall card for something a little different.


I stamped the blossom branch in Close to Cocoa on Whisper White card then coloured in the blossoms with a water-colour pencil and an aquabrush, then I inked the edges of the white card with the Cocoa ink. This was then mounted onto textured Wild Wasabi card, and the top two corners were cut away using a small circle punch.

I cut a strip of Groovy Guava cardstock and punched the scallops using the Scallop Border punch. The holes were made in each scallop using the 1/8" hole punch on the Crop-a-Dile.
The next step was to mount it on Chocolate Chip card and attach 2 gold brads in the top corners.

I used the Afternoon Tea Designer Series paper to mount onto the Guava base card. Then I positioned the taffeta Choc. Chip ribbon underneath and marked the spine of the card so that I could then cut a slit for the ribbon to pass through and attached it to the inside of the card.
I cut another small piece of ribbon and tied it in a knot around the longer strip then attached this strip to the card and adhered the edge of the ribbon inside the card too.

I stamped the greeting in Wild Wasabi on White card, punched it out using the Square Scallop Punch and attached it to a larger square of textured Wild Wasabi card. This was then adhered underneath the ribbon knot.

For the final touch, I added some Kindy Glitz to the blossom centres. (I don't know if the glitter shows up on this small photo but if you enlarge it, you can see where the glitter is.)

Stampin' Up supplies:-
Cardstock -Groovy Guava, Whisper White, textured Wild Wasabi, Chocolate Chip.
Designer Series paper - Afternoon Tea.
Stamps - Embrace Life, Say it with Scallops (both from the Summer Mini).
Ribbon - Chocolate Chip taffeta.
Punch - Square Scallop.

Non-SU supplies:- Gold brads, Kindy Glitz - Crystalline.

Well, I hope you like these two cards - I have already started another one which I'll upload in the next day or two.


Thanks for visiting !

Summer Mini catalogue has arrived !

Well, the Summer Mini promotion has officially started - it runs through from 1st Dec. '08 to 31st March '09 and if you're quick and get your orders in this week, you'll have your goodies just in time for Christmas.

There are some beautiful floral stamp sets and really colourful designer papers but the one product that is everyone's favourite is the scallop border punch ! (See the punch below on my desk with some of the other new goodies.)

Just think, no more using decorative scalloped scissors to cut an edge on your cards only to find that it's crooked when you've finished or it hasn't cut cleanly and there are bits of paper hangingoff the edge !

Now it's so easy to decorate your cards with this wonderful punch and you can make the scalloped border as short or as long as you like - just slide your paper along the guide, matching up the scallops and keep punching. You'll definitely want one of these on your craft desk !

Have a look at some of the gorgeous papers available in this new catalogue - the colours are absolutely stunning, really bright and so pretty. They just get you so inspired to create immediately !

Now that I've tempted you with a glimpse of what's available, go to the link at the right-hand side of my blog to view the catalogue on-line and start your Christmas Shopping now!

Here's a hint - browse through the catalogue, send me your Christmas Wish List then tell your family and friends to contact me so that I can tell them what you would really like to receive in your Christmas stocking this year (and it will make things so much easier for them as they won't get headaches trying to come up with the perfect present for you !).

Happy shopping and don't forget to come back and visit my blog as I will upload some photos of my latest creations made with some of these wonderful new products.

'Bye for now.